
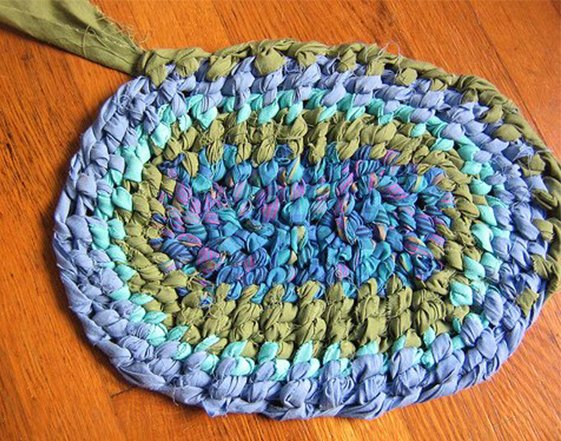
As a product of a great recycling project and a kind of beautiful, if not spectacular, handicraft to look at, a toothbrush rag rug is not as difficult to make as you might think. On the contrary, you can do it very quickly if you master the relevant skills.
It is worth noting that toothbrush rugs take their name from the tools used to make them. These distinctly traditional rugs are made by using modified toothbrushes, strips of fabric, and basic blanket stitching. While these charming oval rugs look complicated, the process of creating them is very simple once you get the hang of making the basic patterns.
Generally, rugs can be made of strips of cloth or leftover scraps of cloth. If you have a lot of old T-shirts, sheets, or other fabrics around the house, then you have the vital materials you need to make a rag rug. If you can braid and sew a stitch, you can create a custom-sized rag rug. Gather your pieces of fabric, then read on and start your DIY journey!
To get started, you’ll need the following things:
Old Toothbrush
Knife
Scissors
Needle
Thread
16 yards of cotton or cotton-polyester fabric
Rattail file
Sandpaper
Drill
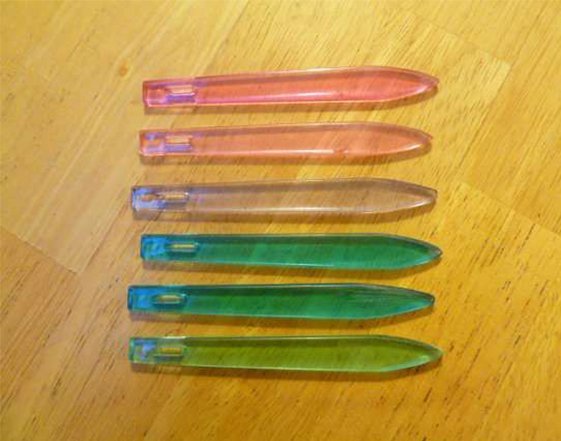
To begin with, the first step, make the needle.
1. Use a knife to cut off the bristles and the head of the toothbrush.
2. Sharpen the end of the toothbrush and shape it into a point.
3. Using tools such as file and sandpaper to make the edges of the needle smooth.
4. Drill a hole in the other end of the old toothbrush handle, about 3/8 inch in size.
5. Sand the inside of the hole with a file and sandpaper.
Then, in step two, prepare the fabric.
1. Snip one side of the fabric every inch.
2. Tear the fabric into one-inch strips.
3. Trim the stray lines along the edge of the strips.
4 When you reach the end, add new strips, overlap the end of the one used with another, and stitch them together as close to the end as possible.
Now you’re going to start the third step, the production of the center.
1. Use a needle and thread to baste the ends of the three strips together.
2. Pin the sewn strips to the arms of the padded chair or to a pillow to keep them in place to free up your hands for the rest of the steps.
3. Braid until you have a plait about 12 inches long, which can contribute to a 36-inch rug.
4. Cut off the two strips below the braid and sew them to the third to ensure a firm braid.
Finally, the fourth step, both critical and complex, the rug weaving.
1. Thread the rest of the strip through the hole in the needle, leaving a five-inch tail.
2. Put the tip of the toothbrush needle up through the first loop on the right side of the braid, but not all the way through.
3. Wrap one end of the strip behind the needle in a large loop, and thread one end of the strip through the circle with a needle.
4. Pull the needle and attached strip through the circle and the rest of the braid loop, and pull up tightly.
5. Continue the blanket stitch until you reach the end of the braid.
6. Make two stitches on the last loop to the right of the braid
7. Turn the rug over and sew two stitches in the first loop on the new right-hand side.
8. Repeat making stitches, one for each braid loop, until you reach the end of the braid.
9. Make two stitches in the last braid to create the corner of the rug, then turn the rug over and make two stitches on the next loop.
10. Continue to edge the rug with each stitch from the previous row.
11. Make two stitches on the last straight edge of the circle before. Start with the first round of double stitches and put a stitch on the short end. Make two stitches on the first stitch on the other side. As your rug widens, there will be more and more stitches at the short end. Continue sewing in each corner.
Here are some tips that might help you:
1. Make sure all the fabric is colorfast. If it’s new, wash off the excess dye first.
3. Stretchy fabrics, such as knits, are difficult to use for rugs.
After reading this article about making a toothbrush rug, go ahead and try making your rug! Feel free to share yours with us in the comments section.